Sup again! Here we go again to do this week’s assignment. Now, we actually have to send real sensor data over the internet and display it on a dashboard. Like, a REAL dashboard. I was lowkey intimidated but also very much excited.
Here’s the documentation.
How does this actually work?
Before diving in, I think it helps to understand the flow first, because honestly it took me a moment to wrap my head around it.
The idea is:
The BMP180 sensor talks to the ESP32 using I2C, a short-range communication protocol. The ESP32 then takes that data and sends it over Wi-Fi to a public MQTT broker (we used broker.hivemq.com). From there, Node-RED (running locally on my MacBook) subscribes to those messages and visualizes them on a browser dashboard.
So the whole process looks like this:
BMP180 → (I2C) → ESP32 → (Wi-Fi / MQTT Publish) → broker.hivemq.com → (MQTT Subscribe) → Node-RED → Dashboard at localhost:1880/ui
It sounds like a lot, but each step is pretty manageable once you break it down.
Wiring the Hardware
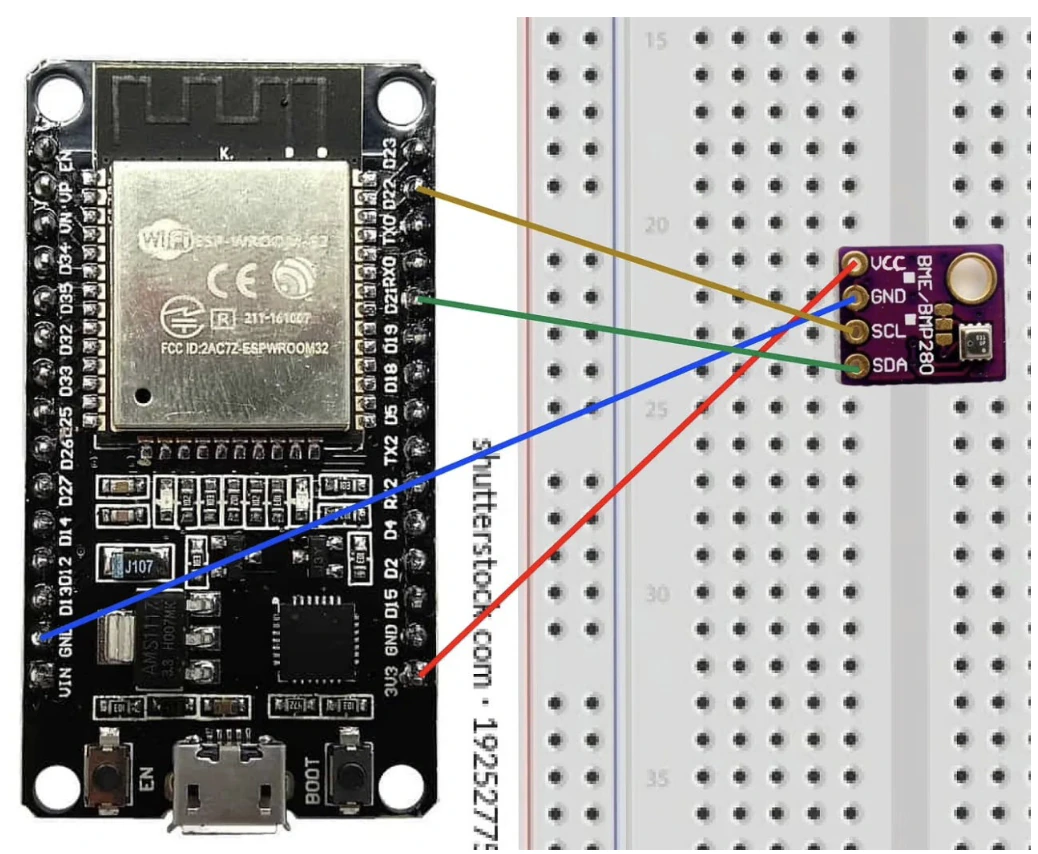
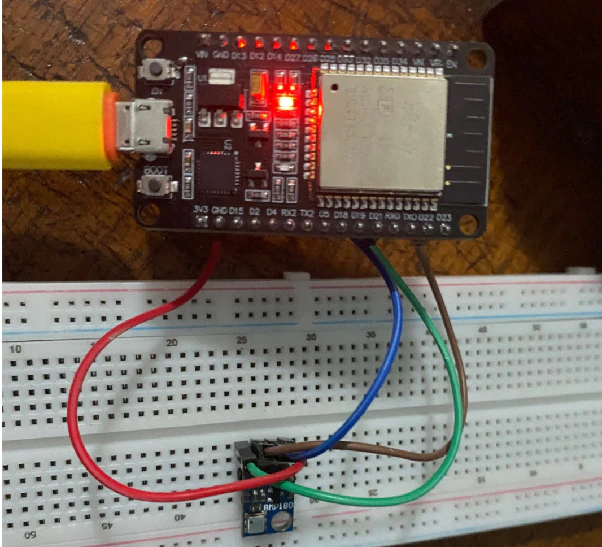
Connecting BMP180 to ESP32 uses I2C, which only needs 4 wires:
- VCC (sensor) → 3.3V (ESP32)
- GND (sensor) → GND (ESP32)
- SCL (sensor) → GPIO 22 (ESP32)
- SDA (sensor) → GPIO 21 (ESP32)
Setting Up the Software (macOS Apple Silicon)
Node.js & Node-RED
First, download Node.js LTS from nodejs.org and install it. Then open Terminal and run:
sudo npm install -g --unsafe-perm node-red
On macOS, there’s a decent chance you’ll hit an EACCES permission error when installing packages. If that happens, fix it with:
sudo chown -R $(whoami) ~/.npm ~/.node-red
Then just type node-red to start it, and open your browser at http://localhost:1880/.
Arduino IDE Setup
Add the ESP32 board URL in Arduino IDE settings:
https://raw.githubusercontent.com/espressif/arduino-esp32/gh-pages/package_esp32_index.json
Install the esp32 by Espressif Systems board via Boards Manager.
Install two libraries through Library Manager:
- Adafruit BMP085 Library (yes, BMP085, it also works for BMP180)
- PubSubClient (handles the MQTT communication)
The Firmware Code
This is the code I uploaded to the ESP32. It reads temperature and pressure from the sensor, then publishes both values to the MQTT broker every 3 seconds.
#include <WiFi.h>
#include <Wire.h>
#include <Adafruit_BMP085.h>
#include <PubSubClient.h>

// Wi-Fi
const char* ssid = "WIFI_SSID";
const char* password = "WIFI_PASSWORD";

// Public MQTT Broker
const char* mqtt_server = "broker.hivemq.com";

WiFiClient espClient;
PubSubClient client(espClient);
Adafruit_BMP085 bmp;
unsigned long lastMsg = 0;

void setup() {
 Serial.begin(115200);
 setup_wifi();
 client.setServer(mqtt_server, 1883);
 if (!bmp.begin()) {
   Serial.println("Sensor BMP180 tidak terdeteksi! Periksa kabel.");
   while (1) {}
 }
}

void setup_wifi() {
 delay(10);
 Serial.println("\nMenghubungkan ke Wi-Fi...");
 WiFi.begin(ssid, password);
 while (WiFi.status() != WL_CONNECTED) {
   delay(500);
   Serial.print(".");
 }
 Serial.println("\nWi-Fi Terhubung!");
}

void reconnect() {
 while (!client.connected()) {
   Serial.print("Mencoba koneksi MQTT...");
   // unique id
   String clientId = "ESP32Client-" + String(random(0, 1000));
   if (client.connect(clientId.c_str())) {
     Serial.println("Terhubung ke Broker!");
   } else {
     Serial.print("Gagal, rc=");
     Serial.print(client.state());
     Serial.println(" Coba lagi dalam 5 detik");
     delay(5000);
   }
 }
}

void loop() {
 if (!client.connected()) {
   reconnect();
 }
 client.loop();

 unsigned long now = millis();
 if (now - lastMsg > 3000) { // Kirim data setiap 3 detik
   lastMsg = now;
   float temperature = bmp.readTemperature();
   float pressure = bmp.readPressure();

   // Konversi float ke string
   char tempStr[8];
   dtostrf(temperature, 1, 2, tempStr);
   char pressStr[10];
   dtostrf(pressure, 1, 2, pressStr);

   // Publish ke MQTT Topic
   client.publish("18224001/sensor/suhu", tempStr);
   client.publish("18224001/sensor/tekanan", pressStr);
   Serial.print("Data Dikirim -> Suhu: "); Serial.print(tempStr);
   Serial.print(" C, Tekanan: "); Serial.print(pressStr); Serial.println(" Pa");
 }
}
The random client ID is a small trick to avoid conflicts on the public broker, since anyone in the world can connect to broker.hivemq.com and you don’t want your device accidentally colliding with someone else’s. The topic names (18224001/sensor/suhu and 18224001/sensor/tekanan) use my NIM as the prefix, which keeps them unique enough.
After uploading, the Serial Monitor showed a stream of readings: temperature sitting around 28.40°C and pressure around 93058 to 93067 Pa. That means it’s working.

Building the Node-RED Dashboard
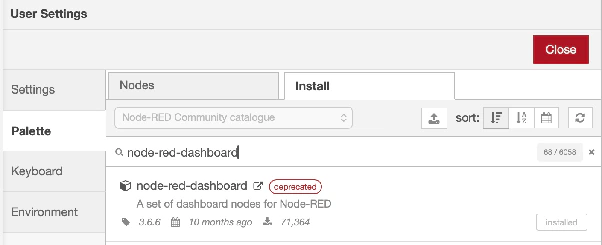
1. Open Node-RED’s Manage Palette and install node-red-dashboard.
2. Drag two mqtt in nodes onto the canvas.
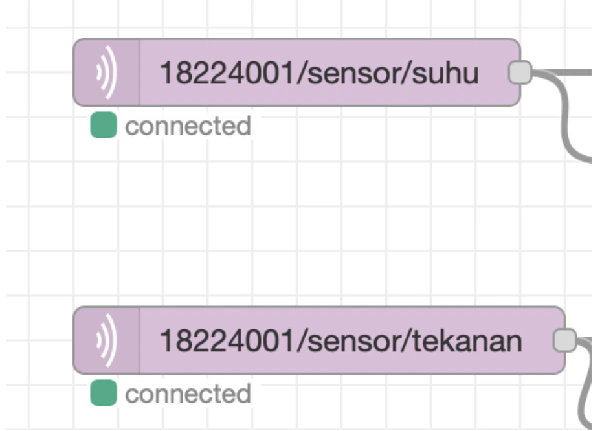
Drag two mqtt in nodes onto the canvas, one for suhu and one for tekanan. Configure each to subscribe to broker.hivemq.com:1883, with topics exactly matching the ESP32 code:
18224001/sensor/suhu18224001/sensor/tekanan
3. Connect each mqtt in node to a gauge node.
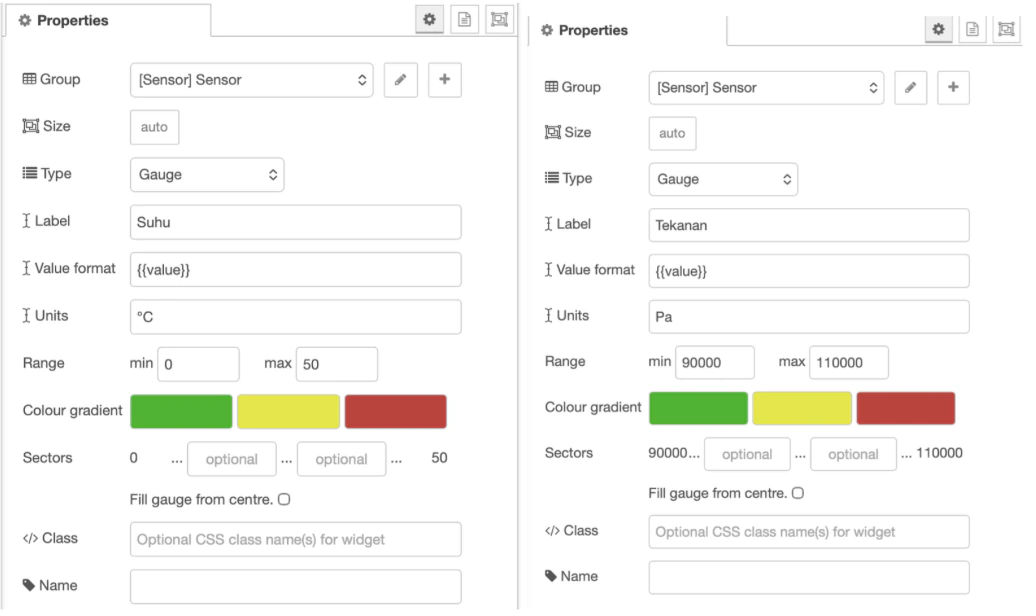
Configure them like this:
Suhu gauge:
- Label: Suhu
- Unit: °C
- Range: 0–50
Tekanan gauge:
- Label: Tekanan
- Unit: Pa
- Range: 90000–110000
Both gauges go into the same UI Group and Tab, named Sensor.

4. Hit Deploy (top right corner)
Result
TADA!!! It actually worked :D
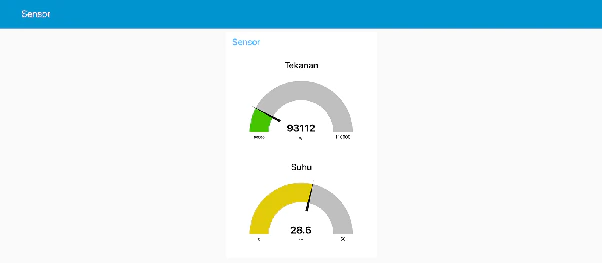
The Serial Monitor confirmed the ESP32 was connected to Wi-Fi and publishing data. The Node-RED dashboard at localhost:1880/ui showed two live gauges (tekanan at ~93112 Pa, suhu at ~28.6°C) updating in real-time as the sensor kept reading.
The key thing I had to get right was making sure the topic names in Node-RED matched exactly what was in the ESP32 code. Once that clicked, the data just flowed, interesting…